Affiliate disclosure: This guide contains affiliate links. If you purchase through these links, SimTuts earns a small commission at no extra cost to you. We only recommend products we genuinely believe improve the flight sim experience.
You bought MSFS 2024. You loaded in, took off, maybe crashed, maybe landed, and now you are staring at a cockpit full of buttons wondering what you are supposed to actually learn. There is an overwhelming amount of content in this sim and an equally overwhelming amount of advice online. Most of it assumes you already know things you do not.
This guide gives you a path. Not the only path, but a proven one. Follow it roughly in order and you will build skills that stack on each other instead of trying to learn everything at once and retaining nothing.
1. Your First Real Flight
If you have not already, close the airliner. Seriously. The A320neo and 737 will be there later. Right now you want the Cessna 172 Skyhawk.
Pick an airport you know. Your nearest local airport, the one you have driven past, the one you can see from your house. Set the weather to clear skies and the time to midday. Start on the runway (not cold and dark, not yet). If MSFS 2024 drops you into a walkaround before the flight starts, Sim Update 6 added an option to start a Free Flight without one — take it for now and come back to the walkaround later.
Your only goal for this flight: take off, fly around the area, and come back to the same runway. Do not worry about navigation. Do not worry about ATC. Just get a feel for how the aircraft responds to your inputs. How does it climb? How does it turn? What happens when you pull the throttle back?
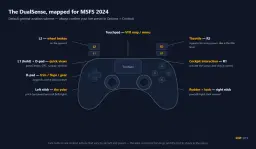
If you are using a controller or keyboard, that is fine for now. You will hit a ceiling eventually and want a joystick or yoke, but do not let gear be a reason not to fly today. When you are ready to upgrade, a Logitech Extreme 3D Pro is the classic budget entry point — twist grip for rudder, throttle slider, and enough buttons to get started. If you know you want to fly airliners specifically, the Thrustmaster TCA Sidestick is worth the extra cost for the Airbus-style grip. For a full breakdown across all price ranges, see the best hardware for airliners guide.
Do this three or four times. Each time, you will notice something new. The way the nose pitches up when you add power. The way the aircraft wants to turn left on takeoff. The way it floats when you are too fast on approach. These observations are the foundation of everything that comes next.
2. Settings That Actually Matter
Before you go deeper, sort out a few settings that make a huge difference to how the sim feels.
Camera Controls
Learn cockpit freelook (right-click and drag, or hat switch on a joystick). You need to be able to look around the cockpit quickly. Set up a few quick views: forward, left window, right window, and instruments. You will use these constantly.
Control Sensitivity
If the aircraft feels twitchy or oversensitive, add some curve to your controls. MSFS 2024 puts everything behind the settings wheel in the main menu, split into five categories: General, Assistances, Controls, Accessibility and VR. Open Settings, then Controls, pick your device, find your axes (pitch, roll, yaw), and add negative sensitivity or increase the dead zone slightly. The goal is smooth, proportional inputs. You should be able to hold a heading without constantly correcting.
Assist Settings
Go to Settings, then Assistances, and turn off the AI pilot aids. The AI pilot will fight you for control of the aircraft and teach you nothing. Turn off the auto-rudder too once you have rudder pedals or a twist stick.
Keep the taxi ribbon on for now — it is in the same Assistances menu. It helps you navigate airports until you learn to read taxiway signs and charts. You can turn it off in a few weeks.
Turn off the cockpit tooltips once you know the basics. They clutter the cockpit and stop you from actually learning where things are. In MSFS 2024 these are not in Assistances: they live under Settings, then General, then Flight Interface, as Instrument Name Tooltips and Instrument Description Tooltips. (They were under Accessibility in MSFS 2020, which is why older guides send you to the wrong menu.)
One Setting to Leave Alone
Do not spend hours tweaking graphics settings. Set the overall quality to something your system runs smoothly at 30+ FPS and move on. You can fine-tune later. Every hour spent fiddling with render scaling is an hour not spent learning to fly.
3. Learning to Land
Landing is the first real skill and it separates people who dabble from people who actually fly. Everything else in the sim depends on being able to put the aircraft on a runway consistently.
The Setup Matters More Than the Flare
Most beginners obsess over the last three seconds of a landing, the flare and touchdown. But 90% of a good landing happens on final approach, thirty seconds before you touch the runway. If you are at the right speed, the right altitude, and lined up with the centreline, the landing almost happens by itself.
For the C172, that means roughly 65 knots on final with full flaps. If you are at 85 knots, you will float halfway down the runway. If you are at 55, you will drop like a stone. Speed control on final is the single most important skill you will develop as a beginner.
Practice Touch-and-Goes
Find a quiet airport with a long runway. Set up in the pattern (rectangular circuit around the airport at about 1,000 feet above the field). Practise circuits: take off, turn crosswind, turn downwind, turn base, turn final, land, apply full power, take off again. Repeat.
This is not glamorous. It is not Instagram-worthy. But after twenty touch-and-goes, you will land better than someone with fifty hours of random flying. After fifty, it will start to feel automatic. That is when things get fun.
When You Are Struggling
If every landing ends in a bounce or a crash, slow down. Are you maintaining 65 knots on final? Are you descending at roughly 500 feet per minute? Are you lined up with the runway before you get to short final? Fix the approach and the landing fixes itself.
4. Understanding the Instruments
You do not need to understand every gauge in the cockpit. You need to understand six of them. They are called the "six-pack" and they have been the foundation of flight instruments for the better part of a century.
The Six-Pack
- Airspeed Indicator (ASI): How fast you are moving through the air, in knots. Different from ground speed. The white arc shows your flap operating range. The green arc is normal operating range. Stay in the green.
- Attitude Indicator (AI): Shows whether you are climbing, descending, banking left, or banking right relative to the horizon. This is your primary instrument in poor visibility.
- Altimeter: Your height above sea level in feet. Make sure it is set to the correct barometric pressure (you will hear this from ATC or see it in the weather). A wrong setting means your altitude reading is wrong.
- Vertical Speed Indicator (VSI): How fast you are climbing or descending, in feet per minute. If it reads -500, you are descending at 500 feet per minute. Useful for maintaining a stable descent on approach.
- Heading Indicator (HI): Which direction you are pointing, shown as a compass rose. In the steam-gauge C172 it is a vacuum-driven gyro that drifts, so set it to match your magnetic compass before each flight and reset it periodically in flight. The G1000 variant takes its heading from an AHRS and a magnetometer instead, so there is nothing to align.
- Turn Coordinator: Shows your rate and direction of turn. The ball in the tube (the inclinometer) tells you whether you are coordinated, skidding, or slipping. Keep the ball centred.
You do not need to memorise all of this today. But start glancing at these instruments during flight. Notice what they read during a climb, during a turn, during a descent. Over time, reading them becomes as automatic as checking your mirrors while driving.
Get flight sim tips in your inbox
New guides, checklists, and tips — no spam. Unsubscribe any time.
5. Navigation Basics
Once you can take off, fly a pattern, and land, the natural question is: how do I get somewhere specific?
GPS Direct-To
The simplest form of navigation. Open the GPS in the C172 (the Garmin GNS 530 or G1000, depending on the variant), enter your destination airport code, and press Direct-To. A magenta line appears on the screen pointing you where to go. Follow it.
The G1000 moving map after a Direct-To to Tracy Municipal (KTCY): the magenta line starts at the aircraft and points at the airport. Rendered by our own G1000 trainer.
This is not cheating. Real-world GA pilots use GPS direct-to constantly. Learn it first, then learn the more traditional methods.
If the knob sequence is what is stopping you rather than the idea, Fly Direct-To a waypoint is free on our browser G1000 trainer and is the same four presses you would make in the C172.
VOR Navigation
VORs are ground-based radio beacons scattered across the world. You tune a frequency, set a course, and follow the needle. It is older technology but still widely used, and understanding VOR navigation teaches you how radio navigation works, which helps when you eventually learn ILS approaches.
For now, just know VORs exist. Use GPS direct-to for your cross-country flights. Come back to VOR when you are comfortable navigating generally.
Using the World Map
In MSFS 2024 you reach it by choosing Free Flight from the main menu, and it is more useful than it looks. You can plan a flight from A to B, add intermediate waypoints, see airport information (runway lengths, frequencies, elevation), and get a rough idea of distance and time. Spend a few minutes with it before each flight.
Set a destination 30 to 60 nautical miles away. Fly there using GPS direct-to. Land. Fly back. That is a cross-country flight. You are already building hours and skills that matter.
6. When to Move to an Airliner
There is no magic hour count. But there are signs you are ready:
- You can land the C172 consistently, three out of four attempts with no drama.
- You can navigate to a specific airport using GPS without getting lost.
- You can hold a specific altitude and heading for several minutes without constant corrections.
- You understand what your six instruments are telling you without having to think about it.
If you tick those boxes, you are ready. If you are still bouncing landings or getting lost on a direct-to flight, keep practising in GA. The airliner will feel ten times more overwhelming if you do not have the basics down.
The jump from GA to airliners is not just about complexity. It is about speed. Everything happens faster in an aircraft doing 140 knots on approach versus 65 knots. If your basic airmanship is solid, you can focus on learning the new systems instead of fighting the fundamentals.
7. The Airliner Learning Path
This is where most people get stuck, because there is so much to learn and no obvious order. Here is the order that works:
Step 1: Cold and Dark Startup
Pick one airliner and learn to start it from a completely dark cockpit. Do not use the "ready to fly" state. You will not understand the aircraft until you understand what every switch does during startup.
The default A320neo or 737 work fine for this. If you want the most realistic experience, the Fenix A320 and PMDG 737 are the gold standard. We have step-by-step cold and dark guides for both, plus the PMDG 777 if you want a widebody.
Step 2: Learn the FMC
The Flight Management Computer is the brain of every modern airliner. It handles your route, performance calculations, and vertical navigation. Learning to program it is a distinct skill from flying the aircraft.
Start with the basics: entering your origin and destination, selecting a runway, and loading a simple flight plan. Our FMC programming guide covers the core concepts that apply to any airliner, and the SimBrief to FMC workflow guide shows you how to use SimBrief (a free flight planning tool) to generate realistic routes and load them into your aircraft.
On the A320 the origin and destination go in together as one FROM/TO entry on the INIT A page, here EGKK/LEPA at 1R. Rendered by our own A320 MCDU trainer.
Reading about the box only gets you so far, and you do not need the sim running to practise it. INIT Page Basics on our browser A320 MCDU trainer and ROUTE Page Basics on the 737 CDU are both free, and both are exactly the "origin, destination, runway, simple flight plan" first pass described above.
Step 3: Learn SIDs and STARs
Once you can program a basic route, the next step is understanding the departure and arrival procedures that connect runways to airways. SIDs and STARs are standardised routes that keep traffic flowing at busy airports. They look intimidating on paper but the concept is straightforward once someone explains it clearly.
Step 4: Learn Instrument Approaches
This is where you learn to land in poor visibility using published procedures. Start with ILS approaches, they are the most common and the most straightforward. Once you are comfortable with ILS, learn RNAV GPS approaches, which use satellite navigation instead of ground-based radio beacons.
When you are ready to go further, learn how to read approach plates, the charts that tell you exactly how to fly each approach. And if you want to explore advanced descent management, our VNAV descent guide covers how to let the aircraft manage your descent profile automatically.
Step 5: Practise the Full Flow
Now put it all together. Plan a flight in SimBrief, load it into the FMC, fly the SID, cruise, fly the STAR, brief and execute an approach, and land. Repeat until the whole flow feels comfortable. This is what airline flying actually is: managing a sequence of procedures, each one building on the last.
8. Career Mode
MSFS 2024 added a career mode that gives your flying some structure. You start with small aircraft and short missions, earn money, unlock new aircraft, and work your way up to airliners. It is a good way to stay motivated and discover aircraft types you might not have tried otherwise.
The career mode is deeper than it looks and has some non-obvious mechanics around money, reputation, and aircraft progression. If you want to make the most of it, our career mode guide covers the systems in detail, and the best aircraft for career mode guide helps you avoid spending your in-game money on aircraft that do not earn it back.
9. Going Online with VATSIM
At some point, default ATC will start to feel robotic and predictable. That is when you are ready for VATSIM, the online network where real humans staff ATC positions and other pilots share your airspace.
It sounds intimidating, and everyone feels that way before their first connection. But the VATSIM community is genuinely welcoming to beginners. You do need to complete a short New Member Orientation course and pass a basic exam before connecting, but it is straightforward and designed to make sure you know the basics of how the network works, not to test your flying skills.
Before you connect, read through our ATC phraseology guide to learn the standard radio calls. Then follow our first VATSIM flight guide for a step-by-step walkthrough of setting up the client, connecting, and flying your first online flight without panic.
10. Common Mistakes Beginners Make
After watching hundreds of beginners learn to fly, the same mistakes come up again and again. Here are the ones that waste the most time:
Trying to learn the A380 (or any complex airliner) first. Every system in an airliner assumes you understand basic flying. If you skip the basics, you will spend hours troubleshooting problems that are not airliner problems, they are flying problems. Start with GA.
Obsessing over graphics settings. Yes, MSFS is gorgeous. No, spending three hours tweaking LOD settings will not make you a better pilot. Set it to something smooth and go fly. Come back to graphics when you have run out of things to learn, which will be never.
Never using checklists. Real pilots use checklists for every phase of flight. Not because they are forgetful, but because skipping a step at the wrong time can end the flight. The sim includes built-in checklists for most aircraft. Use them until the flows become automatic.
Skipping weather. Flying in clear skies is fine for your first few flights. But wind, turbulence, and low visibility are core parts of aviation. Start flying with realistic weather early. Crosswind landings, turbulent approaches, and low-visibility ILS procedures are where the real skill development happens.
Never learning to trim. If you are constantly fighting the stick or yoke to keep the aircraft straight and level, you are not trimming. Trim is the single most important control input that beginners ignore. Learn it in the C172, and it transfers to every aircraft you will ever fly.
Only flying, never studying. Flight simulation rewards knowledge as much as stick skills. Spend some time reading about the concepts, not just practising them in the sim. Understanding why an ILS works makes it much easier to fly one correctly.
For a deeper dive into these and more, read our full beginner mistakes guide.
What to Do Right Now
If you have just installed MSFS 2024 and read this entire guide, here is your next step: open the sim, select the C172, pick a familiar airport, and fly three circuits. Focus on speed control on final approach. That is it. Do not plan a transatlantic flight. Do not install mods. Do not watch a four-hour YouTube tutorial.
Three circuits. Then come back tomorrow and do three more. By the end of the week, you will be landing consistently. By the end of the month, you will be navigating cross-country. And when you eventually sit down in that A320 cockpit, you will understand what you are looking at, because you built the foundation first.
The learning never stops. That is what makes flight simulation different from every other hobby. There is always a next step, always a deeper system to explore, always a harder approach to master. The key is taking those steps in the right order.
You have the order now. Go fly.