RNAV approaches are probably the most confusing thing on a plate for sim pilots. An ILS is straightforward — you intercept the localiser, follow the glideslope, land. But open up an RNAV (GPS) plate and suddenly there are four different sets of minimums, mysterious letters like LPV and LNAV/VNAV, and a profile view that doesn't look quite like an ILS.
The thing is, RNAV approaches aren't actually that complicated once someone explains what the different types mean. And in MSFS 2024 with the PMDG 737 or Fenix A320, you can fly them just as precisely as an ILS — sometimes to even lower minimums.
We'll use the real RNAV (GPS) Y RWY 4L plate at JFK for every example. If you want to follow along, you can view it free on FlightAware.
Want to test yourself on real plates? Our free approach plate quiz drills decision altitudes, frequencies, and missed approaches from real FAA charts.
What Is an RNAV Approach?
An RNAV (GPS) approach is an instrument approach that uses satellite navigation instead of ground-based radio equipment like a localiser or VOR. "RNAV" stands for Area Navigation — it means the aircraft can navigate to any point in space using GPS, rather than following a radio beam from a specific transmitter on the ground.
The big advantage: RNAV approaches can be designed for any runway, even ones that don't have an ILS installed. They're also cheaper to maintain (no ground equipment needed) and can have curved segments, which is impossible with a traditional ILS.
In MSFS, almost every airport with instrument approaches will have at least one RNAV (GPS) approach available.
The Four Types of RNAV Minimums
This is where most of the confusion lives. A single RNAV approach plate will list up to four different sets of minimums, and which one you use depends on your aircraft's equipment:
LPV (Localiser Performance with Vertical guidance)
This is the best you can get on an RNAV approach. LPV uses WAAS (Wide Area Augmentation System) for extremely precise lateral and vertical guidance — comparable to a Category I ILS. The minimums are given as a Decision Altitude (DA), just like an ILS, meaning you follow a glidepath down and decide whether to land or go around at the specified altitude.
On our JFK plate, LPV DA is 232 feet (219 feet above touchdown zone — the "/40" next to it on the plate is the RVR 4000 visibility, not a height). That's very close to ILS minimums.
LNAV/VNAV (Lateral Nav / Vertical Nav)
One step down from LPV. This uses GPS lateral guidance combined with vertical guidance from either WAAS or the aircraft's barometric VNAV system. It also has a DA (Decision Altitude), but the minimums are slightly higher.
On the JFK plate: LNAV/VNAV DA is 329 feet (316 ft HAT).
LNAV (Lateral Navigation only)
This is basic GPS guidance — lateral course only, with no vertical glidepath. Instead of a DA, you get an MDA (Minimum Descent Altitude). You descend to the MDA and then fly level until you either see the runway or reach the missed approach point.
On the JFK plate: LNAV MDA is 480 feet (467 ft HAT). Significantly higher than LPV.
Circling
The highest minimums. Used when you need to circle to a different runway after the approach. Circling MDA of 640 feet (Category A/B) on this plate.
Reading the Plate: RNAV (GPS) Y RWY 4L at JFK
Let's go through each section of this plate systematically.
The Briefing Strip
The top of the plate packs a lot of information into a narrow strip:
- WAAS Ch 77519 — The WAAS channel for this approach
- W04A — The approach reference waypoint identifier
- APP CRS 044° — The final approach course
- Apt Elev 13 — Airport elevation in feet
- Missed approach instructions — "Climb to 3000 direct BARJR..." This tells you what to do if you can't land
Below that is the row of frequencies you'll need: approach control, tower, ground, ATIS. These are critical for VATSIM but also useful for ATC communication in the sim.
The notes mention "Simultaneous approach authorized" and that a flight director or autopilot providing RNAV track guidance is required during simultaneous operations. There's also a temperature limitation worth reading: for uncompensated Baro-VNAV systems, LNAV/VNAV is not authorised below -12°C or above 54°C.
The Plan View
This is the overhead map view of the approach. The key features:
The approach course is the bold line leading to runway 4L on a course of 044°. It starts from waypoint REPRE (the Intermediate Fix, marked "IF"), proceeds through KRSTL (the Final Approach Fix), to the runway. BARJR and DUFFY are the missed-approach fixes — they're not part of the final approach path to the runway.
Getting onto the approach: this particular chart doesn't publish feeder routes or a separate initial approach fix — you'll typically be radar-vectored onto the intermediate fix REPRE. On plates that do have feeder routes, they show up as lighter lines with courses and distances leading to the initial approach fix from surrounding airways and fixes.
The missed approach path is shown as a dashed line — climb to 3000 feet direct BARJR, then track 067° to DUFFY and hold (and don't exceed 210 knots until BARJR). The holding pattern at DUFFY is drawn as a racetrack oval.
Terrain and obstacles are shown by the contour shading along the coast. JFK sits right on the water, so terrain isn't a major factor here, but at mountainous airports these contours become critical.
The Profile View
This is the side-on view showing what your descent looks like vertically.
Reading left to right:
- REPRE at 2000 feet — you start the approach here at 2,000 feet
- Descent at 3.00° — the glidepath angle, shown as "GP 3.00°" on the left. TCH 57 means Threshold Crossing Height of 57 feet (how high you'll be over the runway threshold)
- KRSTL at 1500 feet — the Final Approach Fix (FAF). For LNAV approaches (no vertical guidance), you must not descend below 1,500 feet until past KRSTL
- Distance markers along the bottom: 6.5 NM from REPRE to KRSTL, 3.3 NM from KRSTL to the next segment, 1.2 NM final
The little note *"1.2 NM to RW04L" indicates the Visual Descent Point for LNAV-only approaches — the point where you should have the runway in sight and can descend from the MDA visually.
The bold black line with the arrow descending toward the runway is the RNAV glidepath (used for LPV and LNAV/VNAV). The dashed step-down line is for LNAV-only approaches — you descend in steps between fixes rather than on a smooth glide.
The Minimums Table
This is the bottom of the plate — the numbers that tell you how low you can go.
Each row is a different type of RNAV approach:
| Type | DA/MDA (MSL) | Height Above Touchdown | Visibility |
|---|---|---|---|
| LPV | DA 232 ft | 219 ft | RVR 4000 / 3/4 SM (all cats) |
| LNAV/VNAV | DA 329 ft | 316 ft | RVR 5000 / 1 SM (all cats) |
| LNAV MDA | 480 ft | 467 ft | 1 SM (Cat A/B), 1-3/8 SM (Cat C/D) |
| Circling | 640 ft (Cat A/B) | 627 ft | 1 SM (Cat A/B) up to 2 SM (Cat D) |
The Categories (A, B, C, D) refer to aircraft approach speed categories. Most airliners are Category C or D. A Cessna 172 would be Category A.
The key insight: LPV gets you 248 feet lower than LNAV. That's a huge difference in bad weather. With LPV, you're making a decision at 232 feet — almost ILS Category I performance. With LNAV only, you level off at 480 feet and need to see the runway from there.
LPV vs ILS: Side by Side
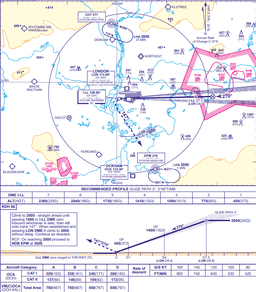
For comparison, here's the ILS or LOC RWY 4L plate for the same runway:
And its profile view and minimums:
The ILS S-ILS-4L minimums are 231/40 — a DA of 231 feet (218 feet above touchdown) — and that single line applies to all aircraft categories. Compare that to LPV's 232/40 and you're looking at a one-foot difference. For practical purposes, an LPV approach gets you just as low as the ILS.
The difference: the ILS requires a physical localiser and glideslope transmitter at the airport. LPV only needs satellites. That's why more and more airports are getting RNAV approaches — they're cheaper and equally precise.
Flying the RNAV Approach in the Sim
PMDG 737 / 777
-
Load the approach: On DEP/ARR, select the arrival airport, then the approach. Choose "RNAV (GPS) Y RWY 04L" and the transition (probably from your STAR's last waypoint).
-
Check the FMC approach page: The LEGS page should show the approach waypoints — REPRE, KRSTL, and the runway. Constraint altitudes should appear next to each fix.
-
Arm the approach: When ATC clears you for the approach, press the APP button on the MCP. The FMA shows LNAV and VNAV (or LPV/GP if the 737 supports it in your installed version). The aircraft will follow the GPS lateral course and descend on the computed glidepath.
-
Monitor the approach: Watch the PFD — the lateral deviation indicator works just like a localiser needle, and the vertical deviation shows your glidepath. Both should stay centered.
-
At minimums: If you see the runway environment, continue to land. If not, execute the missed approach. Press TOGA or manually follow the published missed approach procedure.
Important note: The PMDG 737's approach capability depends on the specific model and database. Some versions don't support full LPV — they'll fly LNAV/VNAV instead. Check the FMA to see what mode you're actually in. If it shows "LNAV" without "GP" or "GS," you're on lateral guidance only and need to manage your descent to the MDA manually.
Step 1 is where most RNAV attempts go wrong — the wrong transition, or an approach loaded but never executed. The free EXEC Light scenario in our browser 737 CDU trainer covers the commit step that catches people out; the Premium Approach Numbers (APPROACH REF) and Intercept From Vectors scenarios go further, the second being how you rebuild a plan that will actually sequence after ATC vectors you off.
Fenix A320
-
Load the approach: On the MCDU F-PLN page, select the arrival and choose the RNAV approach. Select the appropriate transition.
-
Activate the approach: Press the APPR button on the FCU when cleared. The A320 uses its FINAL APP mode for RNAV approaches with vertical guidance.
-
Managed descent: With managed modes active (push the SPD and ALT knobs), the FMGC handles both lateral course tracking and the descent profile. The PFD shows deviation just like an ILS.
-
At minimums: The callouts work the same as for an ILS approach. "MINIMUM" is called at DA, and you decide to land or go around.
The Fenix A320 handles RNAV approaches quite well because the A320 received LPV certification in 2021, joining the growing list of aircraft approved for satellite-based approaches. The managed descent mode does most of the work for you — just monitor the flight path and be ready for a go-around.
The selection sequence in step 1 is identical whether the approach is RNAV or ILS, so it is worth drilling once. On our browser A320 MCDU trainer the Premium ILS RWY 27L at Atlanta scenario walks ARRIVAL → APPR → VIA → INSERT, and The Approach Numbers (PERF APPR) sets the minimums the callouts above depend on. INIT Page Basics is free and is where to start otherwise.
Common Mistakes
I don't know whether to level off or keep descending at minimums
The fix: LPV and LNAV/VNAV give you a DA — fly the glidepath down and decide there. LNAV only gives you an MDA — level off at it and look for the runway while flying level. These are fundamentally different techniques. If you're on LNAV and dive-bomb through the MDA on a glidepath, you're doing it wrong.
I can't tell which minimums line applies to my approach
The fix: read the FMA, not the plate. No vertical approach annunciation (no GP or G/S) means you are on LNAV only, whatever the plate offers. Use LNAV minimums (480 feet), not LPV minimums (232 feet). Flying to the wrong minimums in IMC is dangerous in the real world and embarrassing on VATSIM.
My missed approach caught me out at 200 feet
The fix: brief and set the missed approach before you start the approach. On this plate: climb to 3000 direct BARJR, then track 067° to DUFFY and hold. Have the missed approach altitude (3000) set in the MCP/FCU before you begin. If you have to go around, you want to be ready immediately, not fumbling with the FMC at 200 feet.
My GPS says "LNAV+V" and I don't know what minimums that is
The fix: LNAV+V is LNAV lateral guidance plus an advisory glidepath — you still use LNAV MDA minimums. The +V gives you a visual descent guide only. It is not approved for the lower LNAV/VNAV or LPV minimums, and treating it as if it were is the trap the annunciation sets.
When to Use RNAV vs ILS
If both are available for your runway (like at JFK 4L), it honestly doesn't matter much. The ILS and LPV minimums are nearly identical. Most sim pilots use the ILS because it's more familiar and they've practiced it more. But here are some reasons you might choose the RNAV approach:
- The runway only has an RNAV approach — many smaller airports don't have an ILS
- The RNAV gives you a better route — sometimes the RNAV approach has a shorter final or avoids terrain better
- VATSIM ATC assigns it — you don't get to choose, just fly what you're given
- Practice — if you want to get comfortable with GPS approaches for when you fly into airports that only have them
Regardless of which you fly, the plate reading skills are the same. Understand the plan view, profile view, and minimums table, and you can fly any approach at any airport. The plates are all published in the same format — once you've read one, you can read them all.
All the FAA plates used in this guide are freely available at FlightAware. Go look up the plates for your next flight and brief them before you depart — it's what real pilots do, and it'll make your sim flying noticeably better.