Affiliate disclosure: This guide contains affiliate links. If you purchase through these links, SimTuts earns a small commission at no extra cost to you. We only recommend products we genuinely believe improve the flight sim experience.
The first time you look around a cockpit in VR — actually turn your head and see the overhead panel above you, glance left to check the runway threshold, lean forward to read the standby instruments — you understand why people put up with the setup hassle. Nothing else in flight simulation comes close to the sense of presence that VR delivers.
But getting there involves more steps than plugging in a monitor. You need the right headset, enough PC horsepower, correct runtime configuration, and carefully tuned in-game settings. Get any of these wrong and you will spend more time troubleshooting than flying.
This guide walks you through every step, from choosing a headset to optimising your last graphics setting. It is written specifically for MSFS 2024, which has its own VR quirks and settings compared to its predecessor.
Choosing a VR Headset for Flight Sim
Flight simulation is one of the most demanding VR use cases. You are sitting still, staring at small text on instrument panels, for hours at a time. That means your priorities are different from someone playing Beat Saber:
- Resolution and clarity matter more than anything. You need to read airspeed digits, altimeter needles, and FMC text.
- Comfort for long sessions is critical. A headset that hurts after 20 minutes is useless for a 2-hour transatlantic cruise.
- PCVR capability is mandatory. MSFS 2024 runs on your PC, not standalone on the headset.
- Refresh rate matters less than in action games. Stable 30-45fps with good reprojection beats unstable 90fps.
Budget: Meta Quest 3S (~£230)
The Meta Quest 3S is the cheapest way into VR flight sim that does not involve buying used hardware. It uses the same Snapdragon XR2 Gen 2 chip as the Quest 3, supports the same PCVR connection methods (Link cable, Air Link, Virtual Desktop), and costs roughly half the price.
The tradeoff is the display. The Quest 3S uses Fresnel lenses instead of the Quest 3's pancake lenses, which means a slightly smaller sweet spot and more noticeable god rays around bright cockpit instruments at night. Resolution is lower too, so reading small FMC text requires leaning in slightly. For the price, it is remarkable, but if you are serious about flight sim VR, the Quest 3 is worth the step up.
Best for: Testing whether VR flight sim is for you before committing to more expensive hardware.
Sweet Spot: Meta Quest 3 (~£400 for 512GB)
The Meta Quest 3 is where most flight simmers should start. Pancake lenses deliver a wider sweet spot and better edge-to-edge clarity than the 3S. The display resolution is high enough to read most cockpit instruments at a natural seated distance without leaning forward.
It supports wired USB connection (Link cable), wireless via Air Link (free), and wireless via Virtual Desktop (paid app, but worth it). The 512GB model is the only one currently available new — the 128GB was discontinued in late 2024. For PCVR flight sim the storage size barely matters since games run on your PC, not the headset.
The Quest 3 is lightweight enough for 1-2 hour sessions with the stock strap, though a third-party head strap makes a significant difference for longer flights.
Best for: The vast majority of VR flight simmers. Best balance of price, clarity, and ecosystem support.
No Compromise: Pimax Crystal Light (~£720-£930)
The Pimax Crystal Light is purpose-built for sim use. At 2880x2880 per eye with glass aspheric lenses, the clarity is in a different league. You can read every line of the FMC without leaning in. The 120Hz refresh rate and wide field of view (Pimax claims 115 degrees horizontal, though independent measurements suggest closer to 103-104 degrees) create a sense of immersion that standalone headsets cannot match.
It connects via DisplayPort — no video encoding, no wireless compression, no latency from streaming. This is a wired PCVR headset and it shows in the image quality. The tradeoff is price, weight, and complexity. You need a powerful GPU (RTX 3070 minimum, RTX 4080+ recommended), and setup is more involved than Quest.
Best for: Dedicated sim pilots who want the best visual clarity and are willing to pay for it.
What About the HP Reverb G2?
Do not buy one. Microsoft has deprecated Windows Mixed Reality, which the G2 depends on entirely. Windows 11 24H2 removed WMR support completely. Users on Windows 23H2 will lose support by November 2026. An unofficial SteamVR driver exists as a workaround, but relying on an unsupported hack for a discontinued platform is not a foundation for a VR setup.
If you already own a G2, it still works on Windows 23H2 and earlier, and the visual clarity remains excellent. But plan your replacement now.
PC Requirements for VR
VR in MSFS 2024 is substantially more demanding than flying on a flat monitor. You are rendering two high-resolution views simultaneously, and dropped frames cause physical discomfort rather than just visual annoyance.
Minimum VR Specs (Playable but Compromised)
| Component | Minimum |
|---|---|
| GPU | NVIDIA GTX 1080 / AMD equivalent |
| VRAM | 8 GB |
| CPU | AMD Ryzen 5 5600X / Intel i5-12600K |
| RAM | 16 GB |
| Storage | SSD (NVMe preferred) |
At minimum specs, expect to run low-medium settings at 30fps with reprojection doing heavy lifting. Usable for VFR in a Cessna, but airliners at complex airports will struggle.
Recommended VR Specs (Smooth Experience)
| Component | Recommended |
|---|---|
| GPU | NVIDIA RTX 4070 Ti / AMD RX 7900 XT |
| VRAM | 12 GB+ |
| CPU | AMD Ryzen 7 5800X3D / Intel i7-13700K |
| RAM | 32 GB |
| Storage | NVMe SSD |
This is where VR flight sim becomes genuinely enjoyable. You can run medium-high settings with DLSS and maintain stable frame rates at most airports. The RTX 4070 Ti offers the best performance-per-pound for VR flight sim right now.
No Compromise VR Specs
| Component | Ideal |
|---|---|
| GPU | NVIDIA RTX 4080 / RTX 4090 |
| VRAM | 16 GB+ |
| CPU | AMD Ryzen 7 7800X3D / Intel i7-14700K |
| RAM | 64 GB |
| Storage | NVMe Gen4 SSD |
With an RTX 4080 or RTX 4090, you can push render scaling above 100%, enable higher terrain detail, and maintain smooth frame rates even at photogrammetry-heavy airports like London Heathrow or New York JFK.
RAM matters more than you think in VR. MSFS 2024 is a memory-hungry application, and VR adds overhead. With 16GB you will see occasional stutters as scenery streams in. 32GB is the practical minimum; 64GB eliminates memory-related stutters entirely.
Connecting Your Headset to Your PC
The connection between your VR headset and your PC affects latency, visual quality, and reliability. Get this right before touching any MSFS settings.
Meta Quest 3 / 3S: Three Connection Options
Option 1: Link Cable (Wired)
The most reliable method. A USB-C cable connected directly to your PC eliminates wireless variables entirely. Use a USB 3.0 port — avoid hubs. The official Meta Link Cable is 5 metres, which is long enough for most setups. Third-party cables work fine at half the price.
Wired connection gives you the lowest latency and most consistent frame delivery. If you are serious about VR flight sim, start here.
Option 2: Air Link (Wireless, Free)
Air Link streams your PC's output wirelessly to the Quest. Latency is typically 70-85ms, which is noticeable in fast-paced VR games but perfectly acceptable for flight sim where you are making smooth, gradual inputs.
Requirements for a good Air Link experience:
- Your PC must be connected to your router via Ethernet cable (not WiFi)
- A WiFi 6 or WiFi 6E router with the headset on the 5GHz or 6GHz band
- The router should be in the same room as your headset, or at most one thin wall away
- Minimise other devices on the same WiFi band
For the best wireless experience, consider a dedicated WiFi 6E router connected to your PC via Ethernet, used exclusively for your headset. The TP-Link AXE5400 and ASUS RT-AXE7800 are popular choices in the VR community. Some simmers use the PrismXR Puppis S1, a router purpose-built for wireless VR that connects to your PC via USB-C.
Option 3: Virtual Desktop (Wireless, Paid)
Virtual Desktop is a third-party app (~£20 on the Quest Store) that many simmers prefer over Air Link. It supports higher bitrates than Air Link (up to 850 Mbps with AV1 encoding, or ~150 Mbps with HEVC 10-bit), more granular settings, and importantly, it includes its own native OpenXR runtime (VDXR) that lets you bypass SteamVR entirely.
The visual quality advantage is most noticeable in dark cockpits at night, where HEVC 10-bit encoding preserves shadow detail better than Air Link's encoding.
Setting Up the OpenXR Runtime
This is the single most important configuration step, and getting it wrong is the most common cause of "VR not detected" errors.
MSFS 2024 requires OpenXR. You need to set the correct OpenXR runtime for your headset:
For Meta Quest (Link cable or Air Link):
- Open the Meta Quest PC app
- Go to Settings
- Click "Set Meta Quest Link as active OpenXR runtime"
- Ensure the toggle is active (blue)
For Meta Quest with Virtual Desktop: Virtual Desktop's VDXR acts as its own OpenXR runtime. Follow Virtual Desktop's setup guide to configure it as the active runtime.
For Pimax: Use the Pimax Client to set the Pimax OpenXR runtime as active.
Critical rule: Only ONE OpenXR runtime can be active at a time. If you have SteamVR, Meta, and Virtual Desktop all installed, make sure only the one you are using is set as the active runtime. Conflicting runtimes cause crashes and detection failures.
The Launch Order That Works Every Time
This specific order prevents the dreaded "No VR headset detected" error:
- Put on your headset and enter Link mode (cable) or Air Link / Virtual Desktop
- Confirm you can see your PC desktop in the headset
- Then launch MSFS 2024 from your desktop (you can take the headset off for this)
- Wait until you are in the cockpit on the runway or at a gate
- Press CTRL+TAB to switch into VR mode
If you launch MSFS before your headset is in Link/Air Link mode, the sim will often fail to detect the VR device even after you connect later. Always headset first, then sim.
MSFS 2024 VR Graphics Settings
This is where most people either get great VR performance or give up in frustration. The settings below are a starting point for a mid-to-high-end system (RTX 4070 Ti class). Adjust up or down based on your hardware.
The Settings That Matter Most for VR
Not all graphics settings have equal impact. Here are the ones to focus on, in order of performance impact:
Anti-Aliasing: DLSS Quality (NVIDIA) or TAA (AMD)
On NVIDIA GPUs, DLSS Quality gives you a 25-35% performance boost with minimal visual quality loss. On AMD GPUs, TAA provides the clearest image. FSR2 is available but generally produces softer results than DLSS in VR.
If you have an RTX 40-series or newer GPU, you can also enable Frame Generation (DLSS 3+) for additional smoothness, though some users report it introduces slight artefacts with head movement.
Render Scaling: 80-100%
Start at 80% and increase until performance drops below your target. This is a multiplier on your headset's native resolution. At 80%, you are rendering fewer pixels and relying on upscaling to fill in detail — a good tradeoff for performance. At 100%, you get native resolution clarity. Above 100% is supersampling, which looks sharper but demands significantly more GPU.
Terrain Level of Detail: 100
This controls how detailed the ground terrain mesh is. The default of 100 is fine for most VR use. Lowering it saves performance but makes terrain look flat and angular, which is very noticeable from low altitude. Going above 100 is only worthwhile with high-end GPUs.
Off Screen Terrain Pre-Caching: Ultra
This is critical for VR and easy to overlook. When you turn your head, terrain that was off-screen needs to be ready immediately. Setting this to Ultra ensures the sim pre-loads terrain in all directions, preventing pop-in as you look around. On a flat monitor this setting barely matters. In VR it is essential.
Glass Cockpit Refresh Rate: Medium
This controls how often avionics screens (PFD, ND, FMC displays) update their renders. High updates most frequently, which is expensive. Medium reduces the update rate — you will not notice the difference on instruments, but your GPU will thank you.
Displacement Mapping: Off
This is the single biggest free performance win in VR. Displacement mapping adds 3D depth to ground textures and is nearly invisible from a cockpit at altitude, but it consumes a massive amount of GPU resources. Turning it off can free enough headroom to raise other settings that actually matter for cockpit clarity.
Foveated Rendering: On
Available since Sim Update 2, foveated rendering reduces resolution in your peripheral vision while keeping the centre sharp. With fixed foveated rendering (available on all headsets), the performance gain is significant and the quality tradeoff is barely noticeable — your peripheral vision is naturally low-resolution anyway. If your headset supports eye tracking, eye-tracked foveated rendering dynamically shifts the high-resolution zone to follow your gaze, which is even more effective.
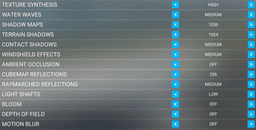
Full Recommended VR Settings Table
| Setting | Recommended Value | Notes |
|---|---|---|
| Anti-Aliasing | DLSS Quality / TAA | DLSS for NVIDIA, TAA for AMD |
| Render Scaling | 80-100% | Start low, increase to taste |
| Terrain Level of Detail | 100 | Lower saves FPS but looks rough |
| Off Screen Terrain Pre-Caching | Ultra | Essential for VR head movement |
| Terrain Vector Data | High | Minimal performance impact |
| Buildings | Medium | Lower at complex airports if needed |
| Trees | High | Draw distance matters in VR |
| Objects Level of Detail | 85-100% | Diminishing returns above 100% |
| Volumetric Clouds | Medium or High | High looks great but costs FPS |
| Texture Resolution | High | Monitor VRAM usage; keep 20% free |
| Anisotropic Filtering | 16x | Improves runway/taxiway clarity |
| Texture Supersampling | 4x4 | Higher values costly, limited benefit in VR |
| Shadow Maps | 1024 | 2048 for cockpit detail if GPU allows |
| Terrain Shadows | 512-1024 | Low impact, subtle effect |
| Contact Shadows | Off | Minimal visual impact, saves FPS |
| Ambient Occlusion | Off or Medium | Medium looks better but costs performance |
| Light Shafts | Off | Looks nice but expensive in VR |
| Bloom | Off | Reduces visual noise in VR |
| Displacement Mapping | Off | Biggest free performance gain |
| Foveated Rendering | On | Use eye-tracked if available |
| Glass Cockpit Refresh Rate | Medium | Low if struggling for FPS |
NVIDIA Control Panel Settings for VR
If you are using an NVIDIA GPU, these driver-level settings affect VR performance:
- Virtual Reality Pre-Rendered Frames: Set to 1 for lowest input lag, or 3 for smoother frame delivery. Try both and see which your brain prefers — setting 1 feels more responsive, setting 3 feels smoother but with slightly more lag.
- Power Management Mode: Prefer Maximum Performance
- Texture Filtering Quality: High Performance
- Low Latency Mode: On (avoid Ultra — community reports it can cap GPU usage in MSFS)
Understanding Reprojection
Reprojection (called ASW on Meta, Motion Smoothing on SteamVR) is your best friend in VR flight sim. Here is what it does: if your PC cannot maintain the full refresh rate (say 72fps on Quest 3), reprojection cuts the target in half (36fps) and generates intermediate frames by analysing head movement.
The result is that 36fps with reprojection often looks and feels smoother than an unstable 50fps without it. This is counterintuitive but true — consistent frame timing matters more than raw frame count.
For most flight simmers, the ideal setup is:
- Set your headset refresh rate to 72Hz or 80Hz (not 90Hz or 120Hz)
- Enable reprojection/ASW
- Target a native 36-40fps in-game
- Reprojection doubles this to 72-80fps perceived
This is far more achievable than trying to maintain a true 90fps, and the visual result in a flight sim cockpit (where motion is generally smooth and predictable) is excellent.
Cockpit Interaction in VR
Interacting with a cockpit in VR is one of the areas where MSFS 2024 has improved significantly since launch, but it still requires some adjustment to your workflow.
Mouse vs VR Controllers
Mouse is still king for cockpit interaction. Despite MSFS supporting VR touch controllers for grabbing knobs and flipping switches, the precision is not there yet for complex avionics work. Programming an FMC or tuning a radio frequency is far easier with a mouse cursor that you can see projected into the VR cockpit.
The VR controllers are better suited to quick interactions — landing gear, flaps, autopilot panel buttons — but for anything requiring precision, use your mouse. You can see the mouse cursor in VR as a small dot projected onto cockpit surfaces.
Physical Flight Controls Are Essential
This is not optional in VR. You cannot see your keyboard while wearing a headset. Every input you need during flight must be available on your physical controls or assigned to a button you can find by touch.
A HOTAS setup or yoke and throttle quadrant become genuinely essential rather than just nice-to-have. Map your most-used commands — gear, flaps, trim, autopilot disconnect, push-to-talk — to physical buttons before your first VR flight. See our hardware guide for specific recommendations.
If you are just starting out, the Thrustmaster TCA Sidestick and Quadrant Airbus Edition is an excellent starting point for VR. It has enough buttons to map essential functions, and the throttle quadrant includes a lever you can use for spoilers or flaps by touch.
The VR Toolbar Issue
The in-game toolbar (weather, ATC, payload, map) has been problematic in VR since launch. Many users report difficulty getting it to appear. The most reliable workarounds:
- Home Cockpit Mode: Enable this in settings. It changes how the toolbar is rendered and makes it consistently accessible, though it alters some mouse view controls.
- Instrument View 1: Pressing the key bound to Instrument View 1 provides a cockpit view with a working toolbar.
- Keyboard shortcuts: Assign toolbar functions (ATC, VFR map, weather) to keyboard keys or HOTAS buttons so you do not need the toolbar at all.
Using the VFR Map in VR
The VFR map can be pinned as a floating panel in your VR cockpit. This is useful for situational awareness during visual approaches. Access it through the toolbar (using one of the workarounds above) and position it where it is readable without blocking instruments.
Comfort: Avoiding Motion Sickness and Surviving Long Sessions
VR motion sickness is real, it affects most people initially, and it can be completely overcome with the right approach.
Why Flight Sim Causes Less Sickness Than You Think
Flight simulation is actually one of the more comfortable VR activities because you are seated and the cockpit provides a fixed visual reference. Your brain sees the cockpit structure staying still (matching your body's lack of movement) while the world moves outside the windows. This is much better than VR games where you walk or run without physical movement.
That said, turbulence, steep turns, and especially spins or unusual attitudes can trigger discomfort, particularly in your first few sessions.
The Adaptation Protocol
- First session: 15-20 minutes. Sit in a parked aircraft, look around the cockpit, get comfortable. Then do a short straight-and-level flight. Stop before you feel any discomfort.
- Sessions 2-5: 30 minutes each. Introduce gentle turns, climbs, and descents. Avoid steep banks. Stop immediately at any hint of nausea.
- Sessions 6-10: 45-60 minutes. You can start flying normal patterns and approaches. Most people find their VR tolerance has built up significantly by this point.
- After 10+ sessions: Most simmers can fly 2+ hours comfortably, including approaches and landings.
The key principle: stop before you feel sick, not after. If you push through nausea, you will associate VR with feeling awful and your brain will trigger sickness faster next time.
Physical Comfort Setup
A fan is not optional. Your face gets warm inside a headset, and warmth accelerates nausea. A desk fan aimed at your face provides airflow that both keeps you cool and gives your brain a subtle physical reference point. Every experienced VR simmer has a fan.
Upgrade your head strap. The stock straps on Quest headsets are adequate for 30-minute sessions but cause pressure points during longer flights. A third-party halo-style head strap redistributes weight to your forehead and back of your head, dramatically improving comfort for 1-2 hour sessions.
Cable management for wired connections. If using a Link cable, a ceiling-mounted cable pulley system keeps the cable off your shoulders and prevents it from pulling on your headset as you turn. Cheap and effective.
Keep water within reach. You will sweat more than you expect. Have a bottle you can grab without removing the headset (practice finding it a few times).
Adjust your IPD correctly. Every headset has an IPD (inter-pupillary distance) adjustment. Set it to match the distance between your pupils — measure with a ruler in a mirror, or use a phone app. Wrong IPD causes eye strain and headaches that worsen over time.
The Experienced VR Simmer's Pre-Flight Workflow
After a few months of VR flying, most simmers develop a consistent routine. Here is what a typical session looks like:
- Plan the flight on your monitor — SimBrief, charts, weather check. You can reference our SimBrief to FMC workflow guide for this.
- Set up physical controls — ensure HOTAS/yoke is powered on and recognised.
- Launch Meta app (or Pico equivalent) and enter Link mode.
- Launch MSFS 2024 on your monitor.
- Set up your flight — select aircraft, airport, weather, time. Do this on the flat screen; it is much faster.
- Load into the cockpit and wait until everything has rendered.
- Press CTRL+TAB to switch to VR.
- Adjust your VR view — centre your view, check you can see and reach all instruments.
- Fly the session in VR.
- Press CTRL+TAB to exit VR when done, or before any menu navigation.
The pattern is simple: prepare on the flat screen, fly in VR. Menu navigation and flight planning are painful in VR, so do them on your monitor first.
Troubleshooting Common VR Problems
"No VR Headset Detected"
This is the most common issue and almost always comes down to launch order or runtime conflicts.
Fixes:
- Ensure your headset is in Link/Air Link mode before launching MSFS
- Check that the correct OpenXR runtime is set as active (only one should be active)
- Fully quit the Meta PC app (not just minimise), restart it, reconnect, then launch MSFS
- If using a VPN, disable it — it can interfere with headset detection
- Try pressing CTRL+TAB multiple times; sometimes the first press does not register
Black Screen When Entering VR
Fixes:
- Press ESC twice — this sometimes clears a rendering state issue
- Disable AI-enhanced upscaled graphics if enabled
- Reduce render scaling to 70% temporarily to confirm it is not a GPU overload issue
- Check your HDMI or DisplayPort cable for damage (for wired PCVR headsets)
- Ensure your GPU drivers are up to date
Stuttering and Poor Frame Rates
Fixes, in order of impact:
- Turn Displacement Mapping to Off (biggest single improvement)
- Lower Render Scaling to 80%
- Set Glass Cockpit Refresh Rate to Low
- Reduce Buildings to Low at complex airports
- Lower Volumetric Clouds to Medium
- Reduce Terrain Level of Detail to 80
- Disable AI traffic and multiplayer
- Ensure Off Screen Terrain Pre-Caching is set to Ultra (counterintuitively, this reduces stutters by pre-loading terrain before you look at it)
- Check that your PC is not thermal throttling — VR sessions push GPUs hard for extended periods
Blurry or Soft Image
Fixes:
- Verify IPD setting matches your actual IPD
- Clean your headset lenses with a microfibre cloth
- Increase Render Scaling (try 100% or higher)
- Switch from DLSS to TAA to see if sharpness improves (DLSS can soften small text)
- Increase Anisotropic Filtering to 16x
- If using wireless connection, increase bitrate in Air Link or Virtual Desktop settings
VR Controllers Not Interacting with Cockpit
Fixes:
- Ensure VR controller bindings are set in MSFS controls menu (search for "VR" in the control settings)
- Try resetting VR controller bindings to default
- Use mouse for cockpit interaction as a reliable fallback — it works consistently
What is Coming: SU5 and Beyond
Sim Update 5, currently in beta with a full release expected in April 2026, brings several VR-specific improvements:
- Improved DirectX 12 stability — simmers in the beta report better frame consistency and reduced ghosting with motion reprojection
- Continued foveated rendering improvements — the technology introduced in SU2 keeps getting refined
- PlayStation VR2 support — a free update bringing VR to the PS5 console version of MSFS 2024
- Camera position fixes — adjusted VR cockpit camera positions for several aircraft including the 737 MAX and Cabri G2
VR in MSFS 2024 has improved dramatically since launch. The first year was rough — performance was worse than MSFS 2020 for many configurations, bugs were frequent, and the VR toolbar was nearly unusable. The critical stability patches throughout 2025 and the improvements in SU3 and SU4 brought it to a state where VR flying is genuinely smooth and enjoyable for most mid-to-high-end hardware configurations.
Quick Reference: GPU Upgrade Decision Guide
If you are getting stutters and considering a hardware upgrade, the GPU is almost always the bottleneck in VR. Here is a quick decision guide:
| Your Current GPU | Upgrade To | Expected VR Improvement |
|---|---|---|
| GTX 1080 / RTX 2060 | RTX 4070 Ti | Transformative — from barely playable to smooth |
| RTX 3060 / 3070 | RTX 4070 Ti | Significant — higher settings, fewer compromises |
| RTX 3080 / 3090 | RTX 4080 | Moderate — more headroom for render scaling and detail |
| RTX 4070 Ti | RTX 4090 | Marginal for most — only needed for highest render scaling |
The sweet spot right now is the RTX 4070 Ti. It handles MSFS 2024 VR at medium-high settings with DLSS, and the price-to-performance ratio is excellent. If budget allows, the RTX 4080 gives you meaningful headroom, particularly at complex airports and with high-resolution headsets like the Pimax Crystal Light.
Start Flying
VR flight sim setup is a one-time process. Once you have your headset connected, your runtime configured, and your settings dialled in, future sessions take about 60 seconds from sitting down to being in the cockpit.
The experience is worth every minute of setup. Looking over your shoulder to check traffic on downwind, glancing at the overhead panel during a startup procedure, or leaning forward to see the runway threshold lights through light fog — these moments are why VR exists for flight sim.
Start with the settings in this guide, fly a few short sessions to build comfort, and adjust from there. Your settings will evolve as you learn what matters most to your eyes and your hardware. And if you want personalised help getting your VR setup dialled in, or want to learn procedures in VR with an experienced instructor, book a SimTuts session — our tutors can screen-share with you in real time to troubleshoot settings and teach you to fly.